To easily find the application, we recommend that you search for “Qmatic”.
Install Orchestra Central on Windows
Preparation:
If you want to install Orchestra Business Intelligence, as part of your Central installation, please read through “Orchestra Business Intelligence” , before you go ahead!
1. Copy the QP_Central__win_<type>-<version_number>.zip file and unpack the files to a suitable directory, such as tmp.
It is recommended that path names containing spaces should not be used.
Configuration - Database
Prepare your database by running the scripts corresponding to your database (Oracle Database / Microsoft SQL / PostgreSQL).
1. Open a database tool that allows you to run a database script (e.g. SQL Developer for Oracle Database, or SQL Server Management Studio for Microsoft SQL). For PostgreSQL see special instructions below.
2. Run the script corresponding to your database in a tool that can execute the script:
Microsoft SQL Server:
<tmp_dir>/db/central-mssql.sql
<tmp_dir>/db/stat-mssql.sql
Oracle Database:
<tmp_dir>/db/central-oracle.sql
<tmp_dir>/db/stat-oracle.sql
PostgreSQL:
1. Make sure the PostgreSQL bin folder is added to environment variables.
2. Open the command prompt in the <tmp_dir>/db/ directory.
3. Run the commands:
psql -U postgres -f central-postgres.sql
and:
psql -U postgres -f stat-postgres.sql
Installation
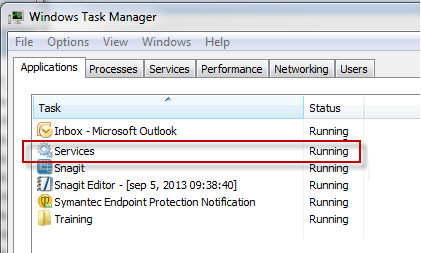
1. Open the Windows Task Manager and ensure that there is no application called “Services” running, see the picture below. If there is, close the Services application. This is done, to not cause any problems with starting and stopping the Orchestra service, during the installation procedure.
If you want to install Orchestra Business Intelligence, as part of your Central installation, please read through “Orchestra Business Intelligence” , before you go ahead!
1. Transfer the QP_Central_linux64-<version>.tgz file to the server, preferably to a tmp directory. Use for example scp to transfer the file.
It is recommended that path names containing spaces should not be used.
2. Login to the Orchestra Central server with a user with superuser rights.
3. Create a qmatic user:
#sudo adduser qmatic
4. Create Orchestra directory:
#sudo mkdir -p /opt/qmatic/orchestra/system
5. Grant rights for Orchestra directory to qmatic user:
#sudo chown -R qmatic:qmatic /opt/qmatic
6. Switch to qmatic user:
#sudo su - qmatic
7. Unpack Orchestra tgz file, to a tmp directory:
$ cd /<tmp_dir>
$ tar zxvf QP_Central_linux64-<version>.tgz
Configuration - Database
Prepare your database by running the scripts corresponding to your database (Oracle Database/Microsoft SQL/PostgreSQL).
The scripts are designed for a rudimentary base installation of Orchestra, and should be reviewed and tuned by the database administrator to match the installation size and performance requirements.
1. Open a database tool that allows you to run a database script (e.g. SQL Developer for Oracle Database, or SQL Server Management Studio for Microsoft SQL). For PostgreSQL see special instructions below.
2. Run the script corresponding to your database in a tool that can execute the script:
Microsoft SQL Server:
<tmp_dir>/db/central-mssql.sql
<tmp_dir>/db/stat-mssql.sql
Oracle Database:
<tmp_dir>/db/central-oracle.sql
<tmp_dir>/db/stat-oracle.sql
The Oracle scripts will create required schemas in default user table-space. Please review the scripts and assign appropriate table-spaces for the schemas. Larger installations may require tuning of some Oracle instance parameters.
 To easily find the application, we recommend that you search for “Qmatic”.